
2010 F150 Mirror Backup Camera Install
#1
 08-24-2010, 04:21 PM


Join Date: Aug 2010
Posts: 53
Likes: 0
Received 0 Likes
on
0 Posts
2010 F150 Mirror Backup Camera Install
Ok, I have finished the rear view camera install, short of having the dealer install the headliner harness when the headliner is replaced due to a manufacturers defect. I have documented a few things that will make any other further installs a little easier.
I DID NOT have the correct main harness with the +/- Video Wires (Brown/Brown-Yellow) or the +/- 12V Power/Ground. If I had the chance to do it again I would probably replace the Main harness coming from the left fender to the rear of the truck for a cleaner install. I assumed that replacing the rear Tail Light Harness was going to provide +12V power and Ground but I was WRONG. If you are not replacing the main harness and your main harness is missing the required wires, then replacing the Tail Light harness only gives you the ability to unplug the Camera Harness from the Main Harness if you need to remove the tailgate. You must provide Power, Ground, and the +/- Video Inputs separately!!!!!
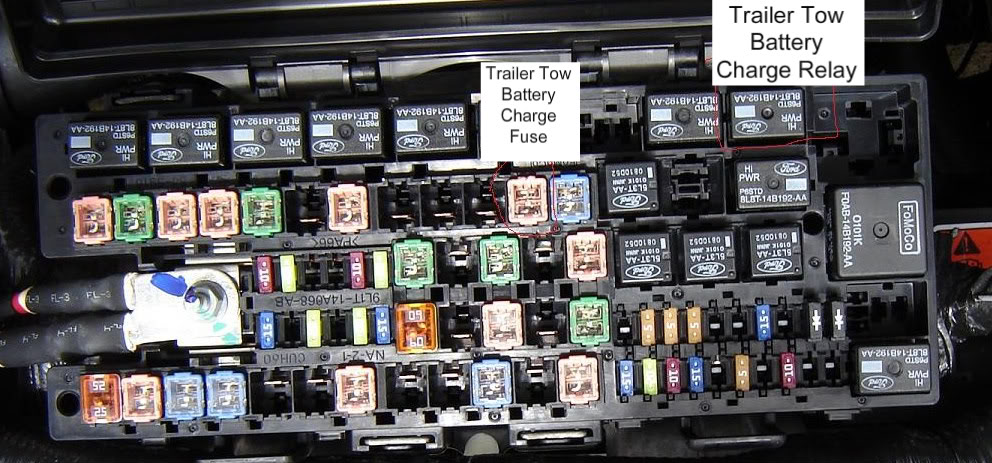
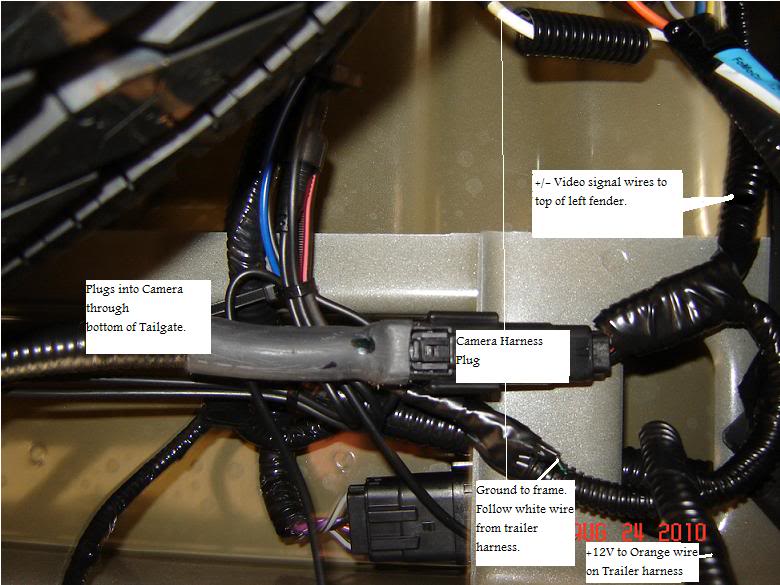
I ended up running 2 wires to mate up to the left inner fender harness. I powered the Camera to the Trailer harness (Orange Wire) and used the Frame for the ground. (Follow the white trailer ground wire to just above the spare tire) In order to use the trailer harness wiring you must install 1 fuse and 1 relay into your fuse/relay Box under the hood, these should come with the Electric Brake wiring harness and will be in a plastic bag with instructions in the glove box or drivers door panel pouch. This gives you switched power for the Camera and eliminates the Blue Screen Delay.
I ordered my Rear Camera, Camera Harness, and Rear View Video Mirror from EBAY member nailsandsales. I highly recommend this seller.
My Mirror was Engineering Part Number 8U5Z17700L (any dealer can cross reference this for a Ford part number) , this is the mirror with Sync in the headliner, not in the mirror. I had it installed by a shop for a few dollars, cheaper than a new windshield or buying the tool.
My Headliner Harness is Part # AL3Z14335JVA, 2010 SuperCrew Lariat w/ Sliding Rear window, Syns in Headliner(not mirror).
In addition I recommend ordering Parts from Tasca Ford, and Dominic was VERY helpful and patient with assisting me. 1-800-788-2114
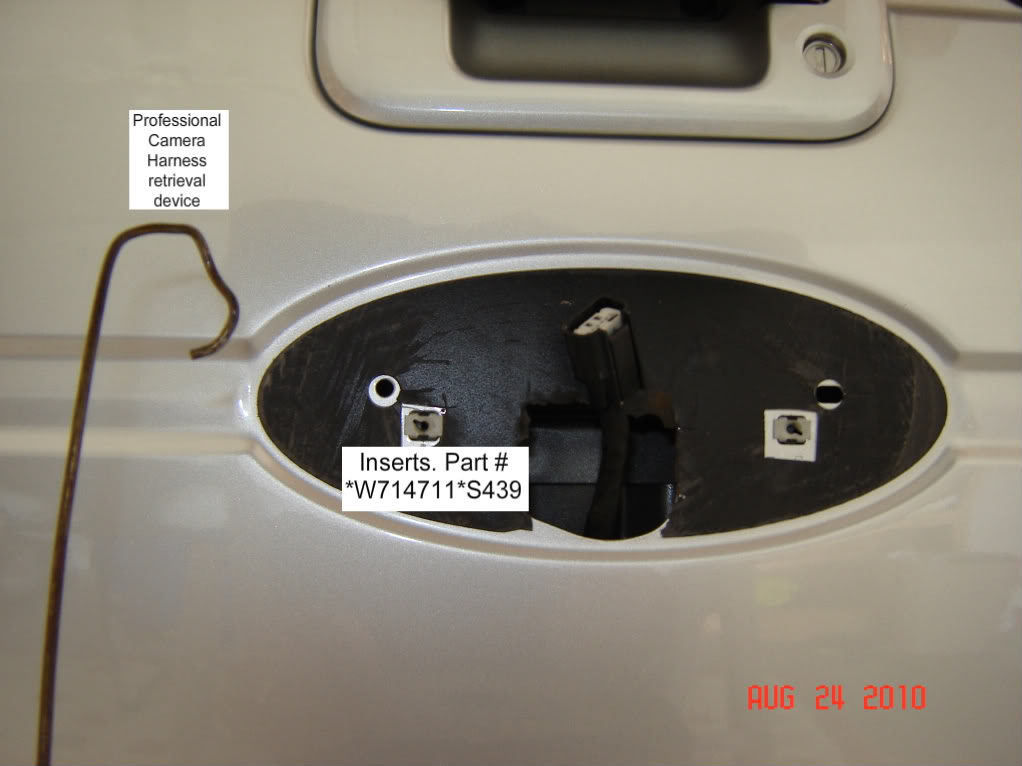
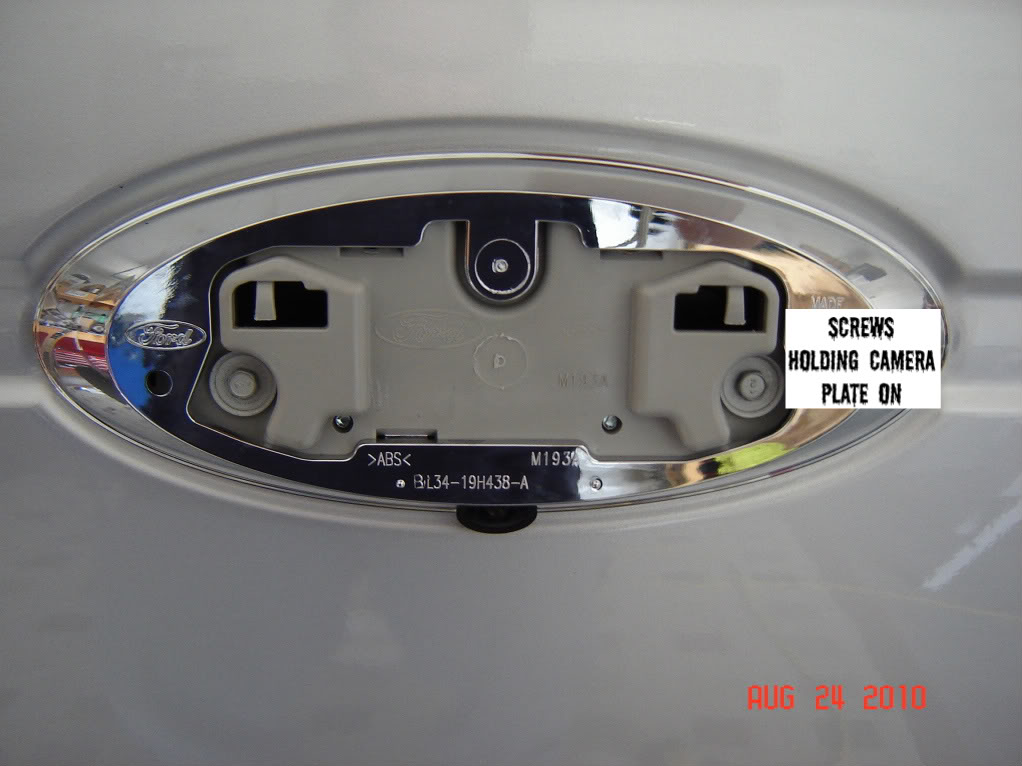
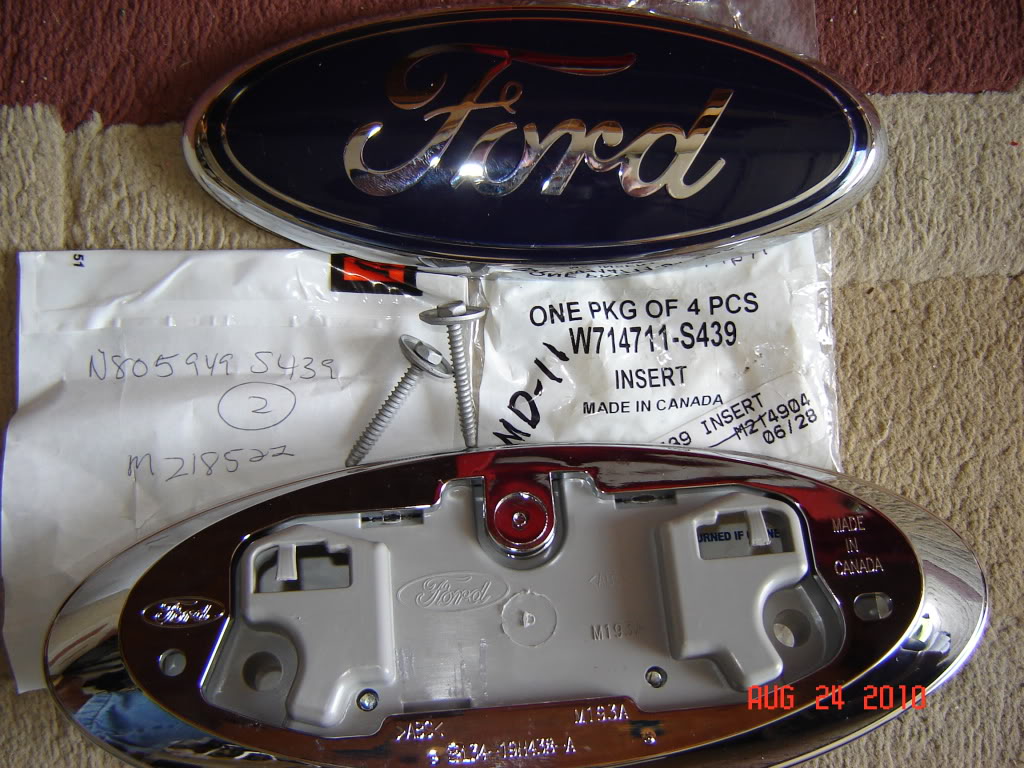
Below are images to help explain the install:
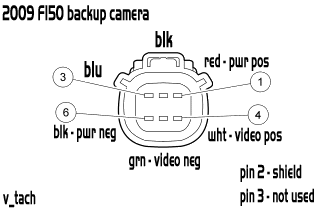
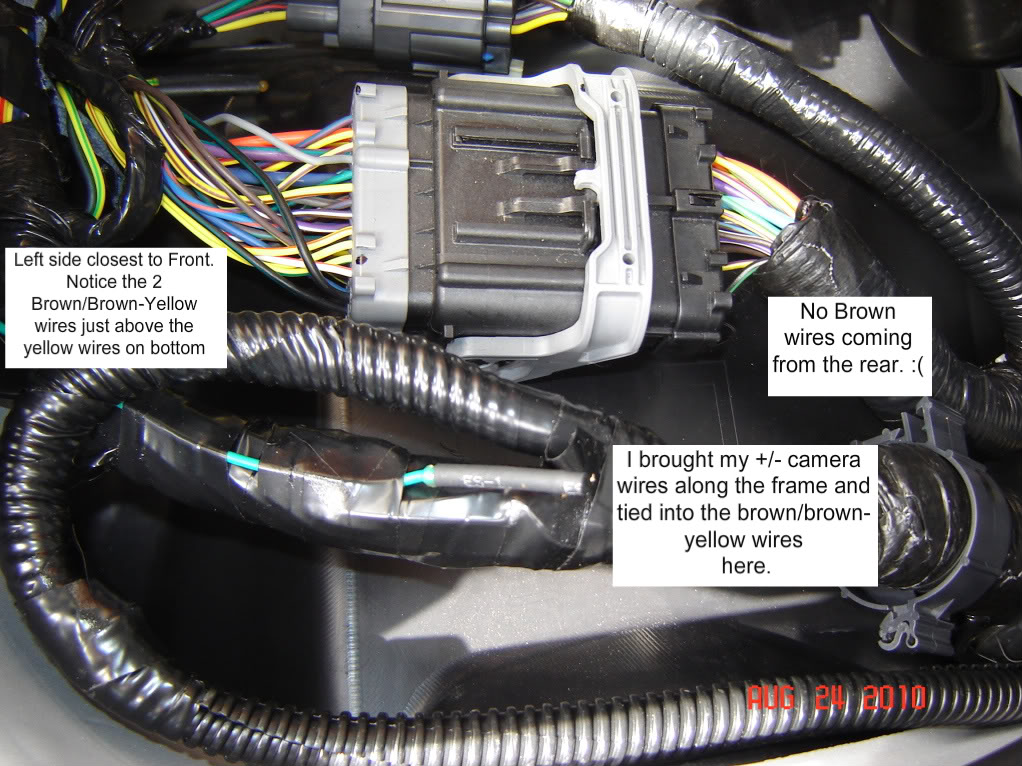
I DID NOT have the correct main harness with the +/- Video Wires (Brown/Brown-Yellow) or the +/- 12V Power/Ground. If I had the chance to do it again I would probably replace the Main harness coming from the left fender to the rear of the truck for a cleaner install. I assumed that replacing the rear Tail Light Harness was going to provide +12V power and Ground but I was WRONG. If you are not replacing the main harness and your main harness is missing the required wires, then replacing the Tail Light harness only gives you the ability to unplug the Camera Harness from the Main Harness if you need to remove the tailgate. You must provide Power, Ground, and the +/- Video Inputs separately!!!!!
I ended up running 2 wires to mate up to the left inner fender harness. I powered the Camera to the Trailer harness (Orange Wire) and used the Frame for the ground. (Follow the white trailer ground wire to just above the spare tire) In order to use the trailer harness wiring you must install 1 fuse and 1 relay into your fuse/relay Box under the hood, these should come with the Electric Brake wiring harness and will be in a plastic bag with instructions in the glove box or drivers door panel pouch. This gives you switched power for the Camera and eliminates the Blue Screen Delay.
I ordered my Rear Camera, Camera Harness, and Rear View Video Mirror from EBAY member nailsandsales. I highly recommend this seller.
My Mirror was Engineering Part Number 8U5Z17700L (any dealer can cross reference this for a Ford part number) , this is the mirror with Sync in the headliner, not in the mirror. I had it installed by a shop for a few dollars, cheaper than a new windshield or buying the tool.
My Headliner Harness is Part # AL3Z14335JVA, 2010 SuperCrew Lariat w/ Sliding Rear window, Syns in Headliner(not mirror).
In addition I recommend ordering Parts from Tasca Ford, and Dominic was VERY helpful and patient with assisting me. 1-800-788-2114
Below are images to help explain the install:
Last edited by fivefiftysix; 08-24-2010 at 04:26 PM.

#3
08-24-2010, 04:41 PM
Join Date: Aug 2010
Posts: 53
Likes: 0
Received 0 Likes
on
0 Posts

#5
08-25-2010, 01:03 AM


#7
08-25-2010, 04:21 PM
Join Date: Aug 2010
Posts: 53
Likes: 0
Received 0 Likes
on
0 Posts
For the headliner on 2009 and Newer Vehicles,
Remove the following on the driver side only:
Sun Visor
(Philips Screws)
A-Pillar Cover
(Has Clips, gently pull towards you)
B-Pillar and Rear Window Pillar Cover
(7mm Bolt right above the Seat Belt Loop under the plastic cover, it also has clips, once you remove the bolt, gently pull the cover towards you. It will not come all the way off since you the seat belt is there, so just pull it enough so that the headliner comes down a few inches.)
Rear round clips in the headliner (Both Sides)
(Gently push up the headliner next to the clips and pull the round clips out by hand)
Sun Glass Holder
(Pull down, it will take a bit of force, grab it from the edge by getting your fingers in the edge towards the back of the holder, one removed unplug the light harness and it will then let you move it out completely, also at this point unplug your mirror harness and the SYNC mic you will be able to access the SYNC mic from the opening for the sunglass holder. Be gentle when unplugging the SYNC Mic)
Coat Hanger
(Torx Bit - Just unscrew)
Rear Reading Lights
(Pull off the clear cover, then pull out the plastic holder, its clipped in so it will take a small amount of pressure to remove it. Once removed unplug the light harness.)
Driver and Passenger Door Weather Stripping
(Gently pull on it from the top portions for both driver and passenger sides, you only need to remove it enough to pull the headliner down a few inches. This isn't glued or anything so its quick and easy.)
Once you have everything removed you will have enough room to move the headliner down a few inches, enough to reach in and unplug the harness, you will see that the main plugs in the back of the vehicle towards the rear window and you can reach in and feel to unplug them.
The original harness is glued to the headliner , it will be a bit tough to tear off, take your time and remove it by pulling on the harness once you have all the connections unplugged. I started from the rear and worked my way forward. The new one you can just push up close to where the old one was and no need to glue it down.
Also wear latex gloves so you don't get oil and residue all over the headliner..
Trending Topics
#8
08-25-2010, 04:24 PM
Join Date: Aug 2010
Posts: 53
Likes: 0
Received 0 Likes
on
0 Posts
Thanks, you are welcome. Hopefully it helps someone with questions. It is not an impossible install. I just learned that I would have replaced the main harness if I had to do it again. I followed the main harness when I wired the video cables and wire tied onto that.
#9
08-26-2010, 12:12 AM


#11
09-01-2010, 02:37 PM

Senior Member

#13
09-01-2010, 07:14 PM
Join Date: Aug 2010
Posts: 53
Likes: 0
Received 0 Likes
on
0 Posts
http://myworld.ebay.com/ebaymotors/nailsandsales/
Probably save a small fortune, he/she can also get the mirror as a package deal.
#14
09-01-2010, 07:48 PM
Senior Member
#15
09-01-2010, 07:54 PM
Join Date: Aug 2010
Posts: 53
Likes: 0
Received 0 Likes
on
0 Posts
https://www.f150online.com/forums/pa...ness-sale.html
check this out as well...depends on what parts you need. 250-300 for camera, harness, and mirror. 60.00 for the headliner harness, then whatever you pay for the mirror to be replaced unless you do that. Then if you do not have the brown wires in the main harness you will need to run those as well.
check this out as well...depends on what parts you need. 250-300 for camera, harness, and mirror. 60.00 for the headliner harness, then whatever you pay for the mirror to be replaced unless you do that. Then if you do not have the brown wires in the main harness you will need to run those as well.
Last edited by fivefiftysix; 09-01-2010 at 08:03 PM.