
Paint your OEM wheels: Step by step w/pics (56k warning)
#1
 11-22-2008, 03:00 PM


Paint your OEM wheels: Step by step w/pics (56k warning)
First off props to zeruin for giving me the quick run-down on how to do this. I'm by no means an expert, but I thought I would share how I painted my wheels in case anyone else wanted to do the same. It is a good way to save some money and completely change the look of your truck. I'll post the way I did mine, although some of the steps are optional.
First you'll need your material:
-Duplicolor wheel paint
-Duplicolor clear coat
-Self-etching primer
-Spray can gun
-Degreaser
-Towel
-Brillo pads
-Spray bottle
-400 grit sandpaper
-Sanding block
-Masking tape
-Index cards
-Newspaper

The first thing I did was wipe down the wheels with some simple green to clean them up.

Then I used some brillo pads to scuff them up a bit and to completely remove all traces of dirt and grime. I kept my wheels really clean so this wasn't too bad, although it may be harder if your wheels are coated in crap.

After brillo pads:
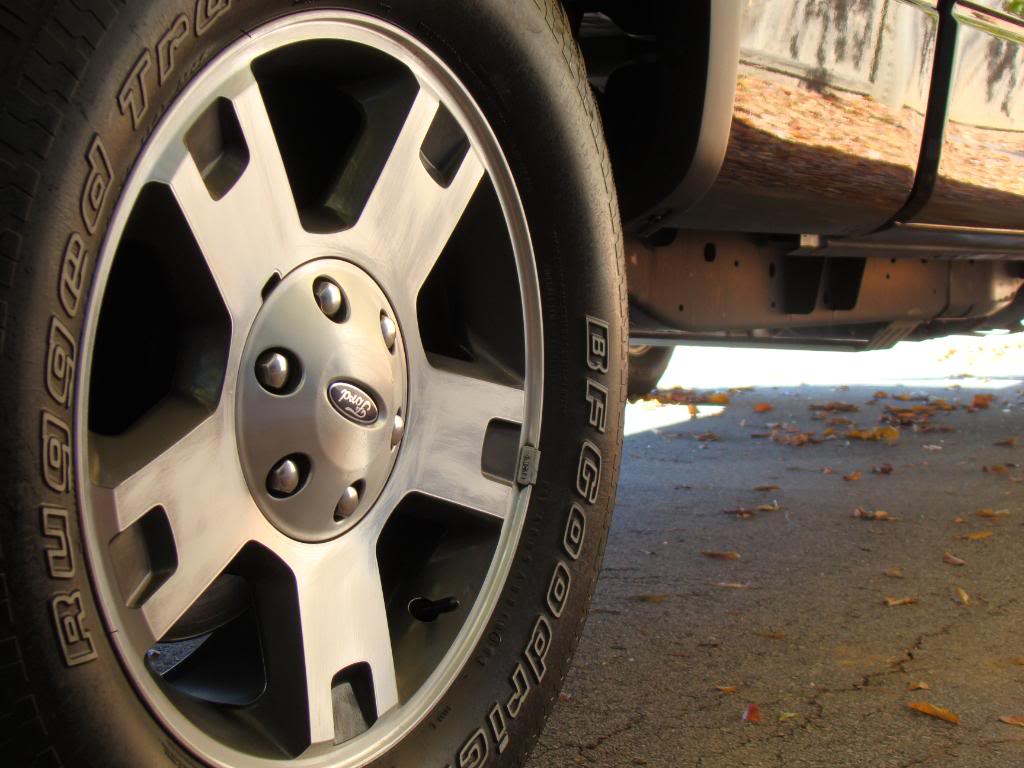
Then take a sanding block and sandpaper and go to town. This was the most tedious step, as you want to make sure to scuff everything up so you have a good bonding surface for the paint. I ripped up some small pieces of sandpaper to get in the smaller grooves. Then use some more degreaser and make sure everything is cleaned up nicely.

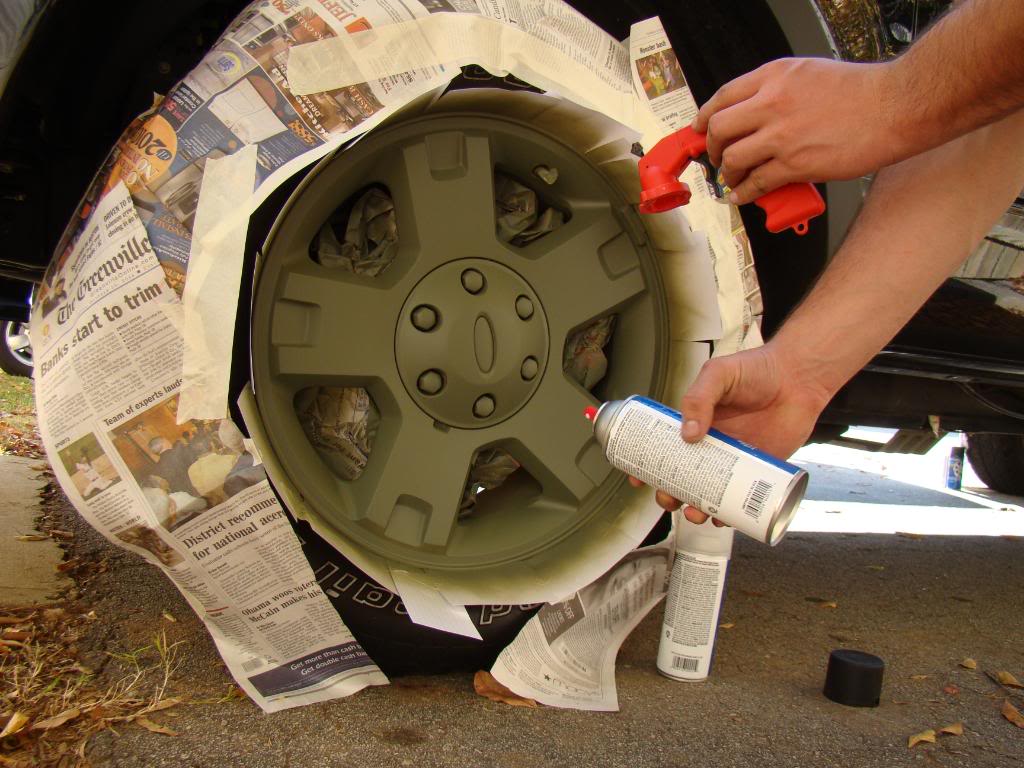
Now mask off your wheels. I used some index cards between the wheel and tire and then masked off the surrounding tire with newspaper. I also stuffed some newspaper between the spokes to avoid painting the rotors. Now use some self-etching primer. I put on two light coats with about ten minutes between coats. Working around the truck with all four tires gives enough time so you shouldn't have to wait any--just keep moving. I was diggin' the army green color, although my neighbors were looking at me like I was crazy.
After letting the primer dry for 30 minutes or so it's time to paint. Grab some of the wheel paint and do light coats. This is always my problem as I like to lay on coats heavier to make sure it's covered evenly. Trust me, light coats and you'll be fine. The first and even second coats may not cover all parts of the wheel, but after a few more light coats it will look great. Same as with the primer, if you're working around all four wheels you shouldn't have to wait between coats.
After first coat (I still think I went too heavy here):

After five coats:

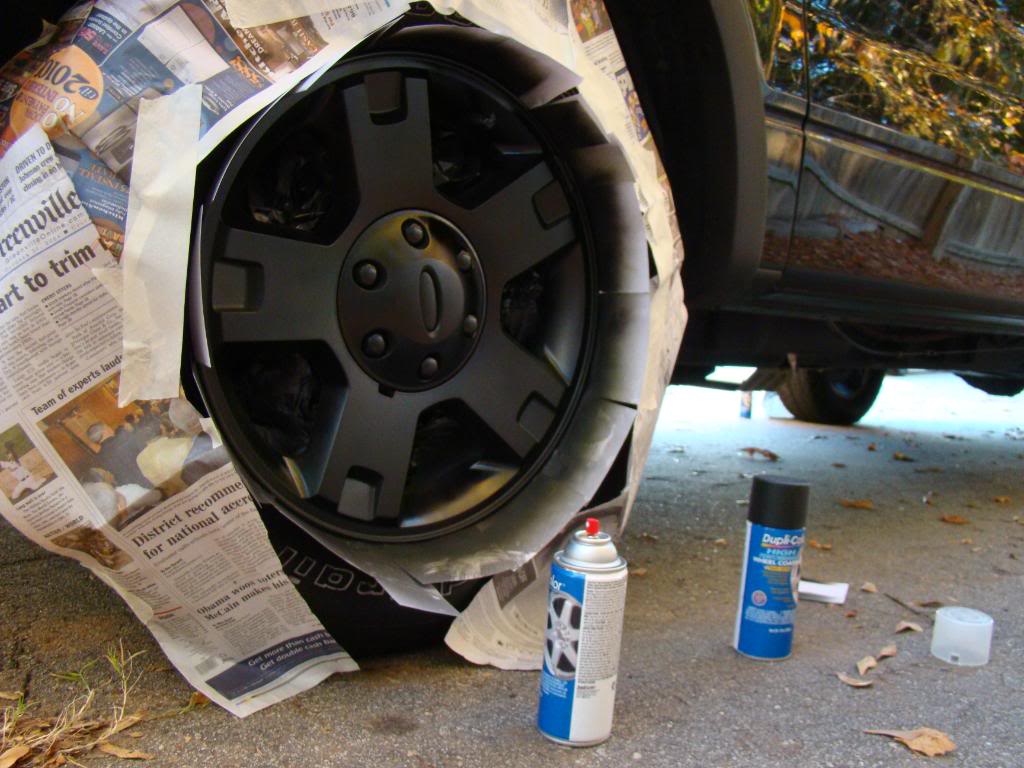
I let the paint dry for 45 minutes and started the clear coat. I did four light coats using the same light coat principle. You can vary this based on how glossy you want your wheels to be. Looking back I wish I'd have done less clear and gone with a more matte finish since my tires are so faded.
After first coat:

After four coats:
Now just let it dry overnight and you'll be set. After the first hour of drying I suggest removing all newspaper and index cards. If you leave them on and let it dry completely there is a chance it will try and tear off some of the paint when you remove it.
Letting it dry:

Newspaper removed:
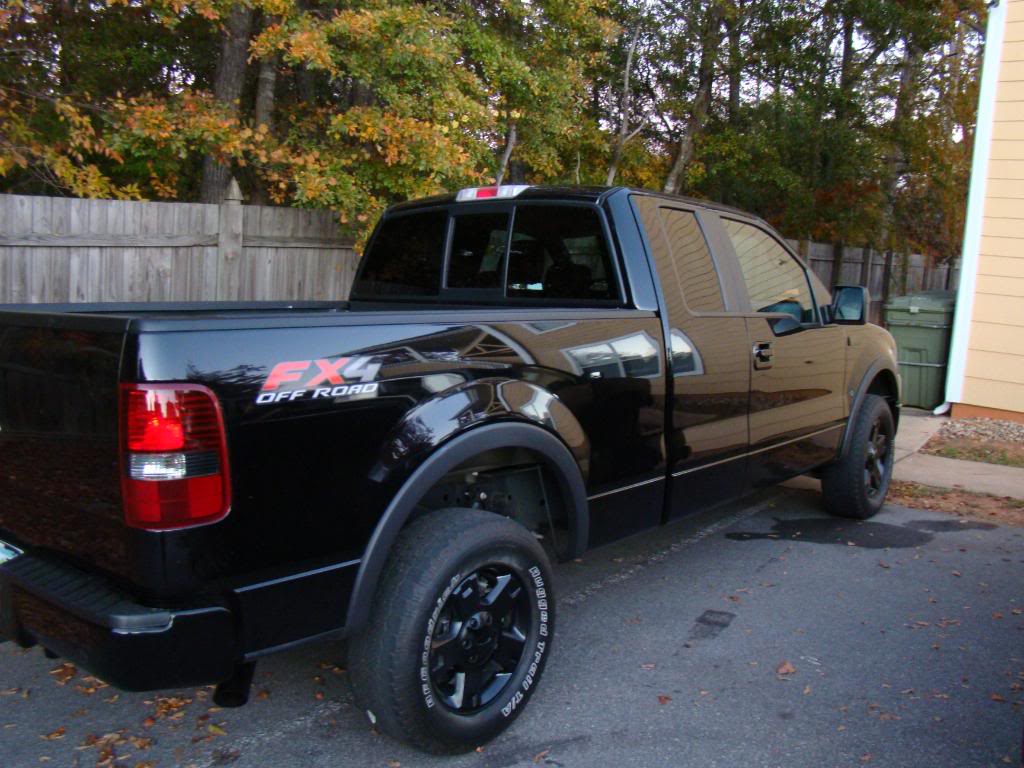
Hopefully this helps if anyone wants to or has been thinking about painting their wheels. It was a very simple process and I'm very happy with the results.
Finished product:


Now I just need some new tires!
First you'll need your material:
-Duplicolor wheel paint
-Duplicolor clear coat
-Self-etching primer
-Spray can gun
-Degreaser
-Towel
-Brillo pads
-Spray bottle
-400 grit sandpaper
-Sanding block
-Masking tape
-Index cards
-Newspaper
The first thing I did was wipe down the wheels with some simple green to clean them up.
Then I used some brillo pads to scuff them up a bit and to completely remove all traces of dirt and grime. I kept my wheels really clean so this wasn't too bad, although it may be harder if your wheels are coated in crap.
After brillo pads:
Then take a sanding block and sandpaper and go to town. This was the most tedious step, as you want to make sure to scuff everything up so you have a good bonding surface for the paint. I ripped up some small pieces of sandpaper to get in the smaller grooves. Then use some more degreaser and make sure everything is cleaned up nicely.
Now mask off your wheels. I used some index cards between the wheel and tire and then masked off the surrounding tire with newspaper. I also stuffed some newspaper between the spokes to avoid painting the rotors. Now use some self-etching primer. I put on two light coats with about ten minutes between coats. Working around the truck with all four tires gives enough time so you shouldn't have to wait any--just keep moving. I was diggin' the army green color, although my neighbors were looking at me like I was crazy.
After letting the primer dry for 30 minutes or so it's time to paint. Grab some of the wheel paint and do light coats. This is always my problem as I like to lay on coats heavier to make sure it's covered evenly. Trust me, light coats and you'll be fine. The first and even second coats may not cover all parts of the wheel, but after a few more light coats it will look great. Same as with the primer, if you're working around all four wheels you shouldn't have to wait between coats.
After first coat (I still think I went too heavy here):
After five coats:
I let the paint dry for 45 minutes and started the clear coat. I did four light coats using the same light coat principle. You can vary this based on how glossy you want your wheels to be. Looking back I wish I'd have done less clear and gone with a more matte finish since my tires are so faded.
After first coat:
After four coats:
Now just let it dry overnight and you'll be set. After the first hour of drying I suggest removing all newspaper and index cards. If you leave them on and let it dry completely there is a chance it will try and tear off some of the paint when you remove it.
Letting it dry:
Newspaper removed:
Hopefully this helps if anyone wants to or has been thinking about painting their wheels. It was a very simple process and I'm very happy with the results.
Finished product:
Now I just need some new tires!
Last edited by mblouir; 02-06-2010 at 12:08 AM.
#2
11-22-2008, 03:07 PM

Senior Member
Join Date: Feb 2007
Location: Native New Yorker
Posts: 3,329
Likes: 0
Received 0 Likes
on
0 Posts
#3
11-22-2008, 03:43 PM

Senior Member
Join Date: Jul 2008
Location: alabama
Posts: 436
Likes: 0
Received 0 Likes
on
0 Posts


#6
11-22-2008, 04:53 PM

Senior Member
Join Date: Nov 2006
Location: Outaouais, Quebec, Canada
Posts: 623
Likes: 0
Received 0 Likes
on
0 Posts
#7
11-22-2008, 06:20 PM
Thanks guys! Hopefully this helps someone.
I thought about that but I'm getting new tires and wheels in January. My purpose in doing this was to see if I'd like my truck blacked out or not.
That's a great point, though, for someone looking to do this permanently. From what I've read it's nothing a little touch-up paint can't fix, but it would be a good idea to take them off first. Also I might add that they've been painted for over a month now and show absolutely no signs of chipping! I've taken them through the self-wash several times and the pressure washer has no effect. Also have scrubbed them with a hand wash pretty vigorously and they're fine. I think this would be a great solution for someone if they want their oem wheels a different color.
Oh and by the way Pat, nice post count
Trending Topics

#9
11-22-2008, 09:50 PM

ive noticed something interesting... (btw, great post) in your pictures, specifically in these: newspaper removed- i can clearly see your FX4 decal. as i scroll down to the next pictures, i cant see it! is this an illusion from the light, or what?? i only ask because i notice this kind of thing. i dont know why....
#10
11-22-2008, 11:10 PM

Senior Member
Join Date: Mar 2008
Location: Texas
Posts: 708
Likes: 0
Received 0 Likes
on
0 Posts
ive noticed something interesting... (btw, great post) in your pictures, specifically in these: newspaper removed- i can clearly see your FX4 decal. as i scroll down to the next pictures, i cant see it! is this an illusion from the light, or what?? i only ask because i notice this kind of thing. i dont know why....
anywho.. Good job mblouir, I think it turned out pretty good. When ya get the new wheels/tires are you gonna lift it up or..? I think the tires would look fine if ya keep some tire dressing on them.

#12
11-23-2008, 12:50 AM
ive noticed something interesting... (btw, great post) in your pictures, specifically in these: newspaper removed- i can clearly see your FX4 decal. as i scroll down to the next pictures, i cant see it! is this an illusion from the light, or what?? i only ask because i notice this kind of thing. i dont know why....
From them looks of it, he actually took them off. From what I know, he plans on picking up some new decals from patriotdecals.com. You can see he had painted his Ford ovals. Check the pic when the orange bag on his hood, the oval still says Ford, then the last pic, it's painted black.
anywho.. Good job mblouir, I think it turned out pretty good. When ya get the new wheels/tires are you gonna lift it up or..? I think the tires would look fine if ya keep some tire dressing on them.
anywho.. Good job mblouir, I think it turned out pretty good. When ya get the new wheels/tires are you gonna lift it up or..? I think the tires would look fine if ya keep some tire dressing on them.
 And yeah I try my best to keep dressing on them but it wears off fast. My apartment complex cuts the grass (dirt) early in the week and my university campus cuts theirs later in the week. So it's a constant battle to keep them shiny.
I'm sure it would be fine as long as you sanded down the wheels enough. I'd even suggest trying a wire cup brush. That should help the sanding process tremendously. Then after using the wire cup brush sand it down with paper. Every red truck I've seen with black wheels looks really mean, I say go for it!
#13
11-24-2008, 08:43 PM

Suspended
Join Date: Jan 2008
Location: Brea, ca
Posts: 1,169
Likes: 0
Received 0 Likes
on
0 Posts


