

Intercoolor Cleaning - A How-To...
#1
 10-15-2003 | 04:45 PM

Thread Starter
|
Senior Member
Joined: May 2001
Posts: 1,327
Likes: 0
From: STL
Well, spent the better part of my Monday off taking out the intercooler to clean it. Here's some stuff I learned in the process... I plan on posting a few times, so be patient before replying as I can only post once a minute I think...
Some tools you will DEFINITELY need (I found out the hard way...had to bike to the damn hardware store):
* 10mm, 13mm Deep sockets (found a whole set for $12.99 at Sears Hardware)
* Lots of extensions, 3/8" swivel
* 8mm, 10mm, 13mm standard sockets
* 4+ cans of Carb Cleaner (found on sale at AutoZone)
* Large adjustable wrench (for EGR nut)
Before you begin, it might be easiest if you remove the belt from the supercharger and drain the intercooler. There's a pet**** (heh) valve on the passenger side of the heat exchanger. Put a bucket uner that and open it up. Should drain almost a gallon of fluid.
Start by pulling off the boot between the Throttle Body and MAF. Put it off to the side.
Remove the hardware that hold the cables to the TB (3 10mm bolts). Remove the TB (this is where you'll need the deep 10mm socket for the bottom 2 bolts)
Remove the rusty EGR setup. Open-ended wrench and socket (10mm from what I remember)
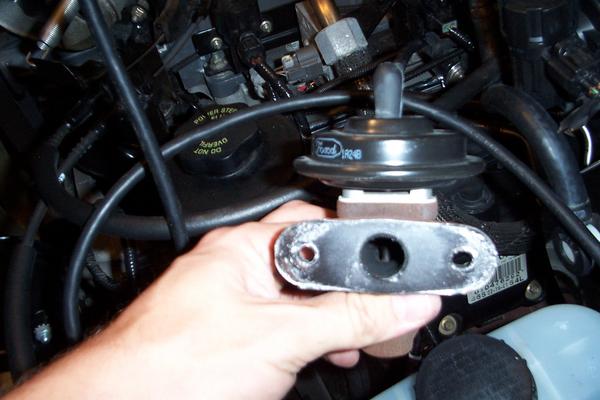
Remove all hoses and cables from anything connected to the TB, upper intake plenum, supercharger and InterCooler.
Remove the upper intake plenum. The back bolts are a bear to get at, but with a swivel and your 10mm socket shouldn't be a problem. Mine was pretty dirty... Here's the front and bottom:
...continued ...
Some tools you will DEFINITELY need (I found out the hard way...had to bike to the damn hardware store):
* 10mm, 13mm Deep sockets (found a whole set for $12.99 at Sears Hardware)
* Lots of extensions, 3/8" swivel
* 8mm, 10mm, 13mm standard sockets
* 4+ cans of Carb Cleaner (found on sale at AutoZone)
* Large adjustable wrench (for EGR nut)
Before you begin, it might be easiest if you remove the belt from the supercharger and drain the intercooler. There's a pet**** (heh) valve on the passenger side of the heat exchanger. Put a bucket uner that and open it up. Should drain almost a gallon of fluid.
Start by pulling off the boot between the Throttle Body and MAF. Put it off to the side.
Remove the hardware that hold the cables to the TB (3 10mm bolts). Remove the TB (this is where you'll need the deep 10mm socket for the bottom 2 bolts)
Remove the rusty EGR setup. Open-ended wrench and socket (10mm from what I remember)
Remove all hoses and cables from anything connected to the TB, upper intake plenum, supercharger and InterCooler.
Remove the upper intake plenum. The back bolts are a bear to get at, but with a swivel and your 10mm socket shouldn't be a problem. Mine was pretty dirty... Here's the front and bottom:
...continued ...
#2
10-15-2003 | 04:47 PM
Thread Starter
|
Senior Member
Joined: May 2001
Posts: 1,327
Likes: 0
From: STL
Part II
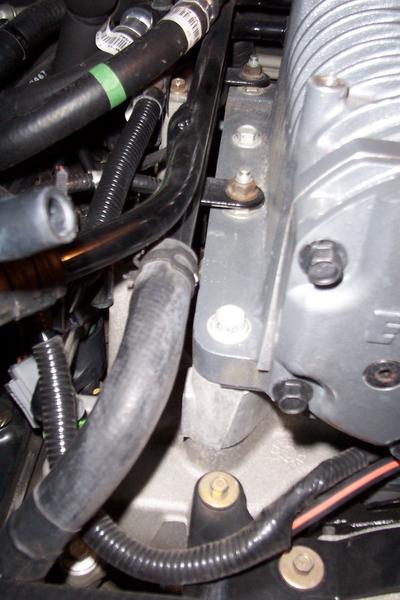
Now remove the supercharger. You'll need to remove the bolts that hold down the intercooler lines on the passenger side, and the bolts that hold the whole EGR setup on the driver side.

Remove the rest of the bolts using the 13mm deep socket and swivels. The back 2 bolts are a PAIN to get out, but have faith, they can be removed. The fiberglass type heat shield along the back top of the firewall kind of gets in the way...
With the supercharger out, there's only 4 bolts that hold in the InterCooler.

There's a vacuum line on the drivers side of the IC that needs to be pulled off. Remove the 4 bolts at the rear of the IC with the 13mm socket and swivels. I removed the IC lines close to the front of the IC, where the hard lines connect with the robber hoses. Left room so fluid would spill out when removing the IC.
...continued...
Remove the rest of the bolts using the 13mm deep socket and swivels. The back 2 bolts are a PAIN to get out, but have faith, they can be removed. The fiberglass type heat shield along the back top of the firewall kind of gets in the way...
With the supercharger out, there's only 4 bolts that hold in the InterCooler.
There's a vacuum line on the drivers side of the IC that needs to be pulled off. Remove the 4 bolts at the rear of the IC with the 13mm socket and swivels. I removed the IC lines close to the front of the IC, where the hard lines connect with the robber hoses. Left room so fluid would spill out when removing the IC.
...continued...
#3
10-15-2003 | 04:48 PM
Thread Starter
|
Senior Member
Joined: May 2001
Posts: 1,327
Likes: 0
From: STL

#4
10-15-2003 | 04:49 PM
Thread Starter
|
Senior Member
Joined: May 2001
Posts: 1,327
Likes: 0
From: STL
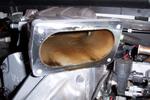
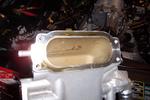
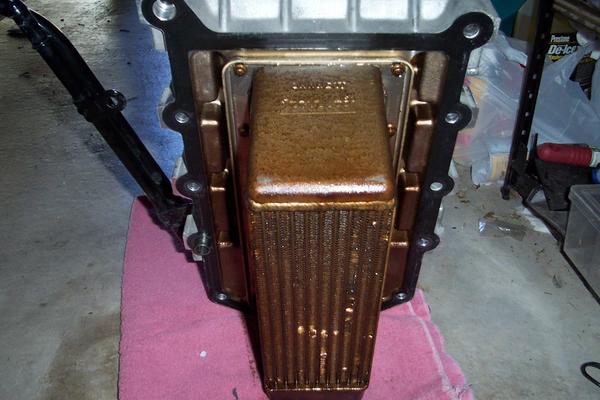
Here's some after pix... note the towel underneath the IC. It was WORSE after I was all done. And a LOT of it ended up on the mulch on the side of my house...heh


Put everything back together in reverse. I tightened everything back up real good on the IC and S/C. I didnt use a torque wrench, as I didn't know the specs, but from what it took to get the bolts off, I pretty much duplicated the efforts putting them back on.
Remember to check that ALL hoses are back on. When I first started it after I was done, it wouldn't even stay running. Realized later that I forgot to connect the one hose that causes ALL this mess - the rear passenger side hose from the crankcase vent.
Took it for a ride afterwards, and OMG!! It was like I had a new truck! Couldn't believe how much of a difference it made!!!
I plan on installing the PCV setup to keep oil from being pulled up that rear hose on the upper plenum. I found I had -0- oil in my rubber intake boot, it was all coming form that back one. He//, when I pulled off that hose, it was DRIPPING with oil!
Hope this helps anyone wanting to do it. It was about a 4 hour job, start to finish. Well worth it IMHO.
-Jeff


#7
10-15-2003 | 05:04 PM
Thread Starter
|
Senior Member
Joined: May 2001
Posts: 1,327
Likes: 0
From: STL
Trending Topics

#9
10-15-2003 | 05:36 PM
Senior Member
Joined: Apr 2000
Posts: 4,402
Likes: 0
From: On the side of the Road attempting to explain 135 miles per hour
Max,
Nice write up!!!! Any photos of the sludge in the lower intake?
However, the supercharger to intake bolts are torque to yield. Use once then pitch 'em.
There's a specific order they are to be installed. It's on the Service CD, don't recall at the moment.
Again, thanks for the write up.
Bob
Nice write up!!!! Any photos of the sludge in the lower intake?
However, the supercharger to intake bolts are torque to yield. Use once then pitch 'em.
There's a specific order they are to be installed. It's on the Service CD, don't recall at the moment.
Again, thanks for the write up.
Bob


#12
10-15-2003 | 05:56 PM

Senior Member
Joined: May 2000
Posts: 806
Likes: 0
From: Seoul
Good gouge. I also pulled my blower off last weekend. I busted two 13mm sockets trying to get one of the S/C bolts off. Finally had to tap a 1/2" socket on and finally got it. Highly recommend getting new S/C bolts. My I/C, S/C, and plenum all looked like crap also. Did you clean them also? Lastly, when you tear the S/C off it is a good time to change plugs. All the knuckle busting stuff is out of the way.
#13
10-15-2003 | 06:01 PM
Thread Starter
|
Senior Member
Joined: May 2001
Posts: 1,327
Likes: 0
From: STL
Originally posted by Speedin Bob
Max,
Nice write up!!!! Any photos of the sludge in the lower intake?
However, the supercharger to intake bolts are torque to yield. Use once then pitch 'em.
There's a specific order they are to be installed. It's on the Service CD, don't recall at the moment.
Again, thanks for the write up.
Bob
Max,
Nice write up!!!! Any photos of the sludge in the lower intake?
However, the supercharger to intake bolts are torque to yield. Use once then pitch 'em.
There's a specific order they are to be installed. It's on the Service CD, don't recall at the moment.
Again, thanks for the write up.
Bob

notice the nice puddle of oil at bottom...

...and OOPS! on the s/c bolts. I don't think I hurt anything putting them back on??
