

JLP Trac Bar Install
#1
 07-30-2004 | 11:20 AM

Thread Starter
|
Senior Member
Joined: Jun 2003
Posts: 362
Likes: 0
From: The Woodlands, Texas
#2
07-30-2004 | 02:27 PM

Senior Member
Joined: Nov 2003
Posts: 139
Likes: 0
From: Sumter SC
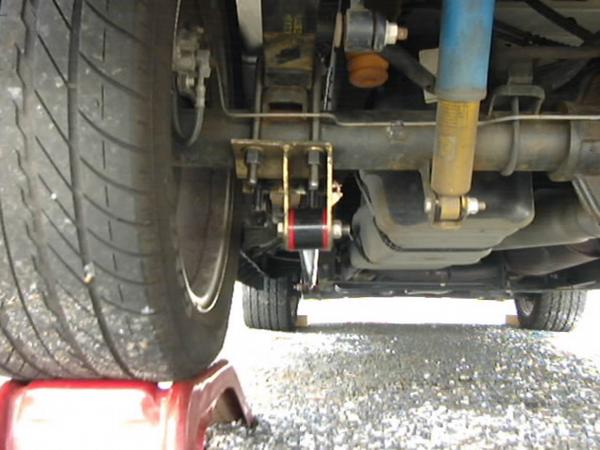
The install is easy; the drilling is the hard part. I bought a couple of bits of each size, one for the pilot hole and the larger, I believe was 3/8 for the frame bolts. You will need a good high speed drill, preferable a 90 degree. I had assessed to a lift, which made the job allot easier. Put the rear brackets on first then attach the bar, don�t tighten fully until everything is in place, next installed the forward brackets with the angle pointing towards your rear wheels, next, I used a scribe to mark my holes, simply lift the bar and bracket until it is aligned with your frame and mark your four holes, drill your holes ( take your time) On the drivers side, I placed a 1x4x6 behind the fuel lines - once you drill through the 1x4 will save your lines. Next bolt the front brackets in place but don�t tighten yet. Torque down the rear ubolts to 75-85lbs and the front I believe was 30-35 lbs. The bars bolts should be around 25lbs as well- note - you don�t want them to tight - you will need a little travel. Ride around for a while, recheck all bolts and then enjoy. Later


#6
07-30-2004 | 02:53 PM

Senior Member
Joined: Mar 2002
Posts: 11,153
Likes: 0
From: Selden NY

I also got mine used with no instructions
(Other than me going blind for a week, it was a tit job) hehehe
#1-Simple unbolt the factory U bolts, replace them with the Longer U-Bolts and Rancho Bar Bracket
#2 Attach the bar at this point (LOSE) and the front Brackets (LOSE) and then simply swing it up and match the front bracket
with 1 hole "THAT IS ALREADY DRILLED IN OUR CHASSIS"
#3 Drill the other 3 holes, repeat for other side, tighten it all up
EASY AS ANYTHING

#7
07-30-2004 | 03:42 PM
Senior Member
Joined: Apr 2000
Posts: 4,402
Likes: 0
From: On the side of the Road attempting to explain 135 miles per hour
Trending Topics

#11
07-31-2004 | 06:46 AM
Senior Member
Joined: Mar 2002
Posts: 11,153
Likes: 0
From: Selden NY
Originally posted by LightningGuy
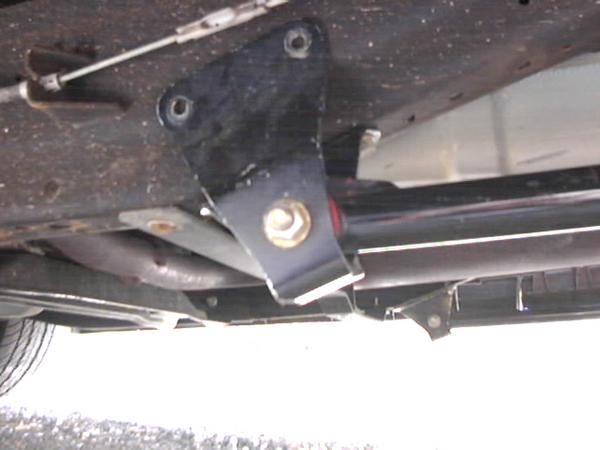
Is it just me or are your rear brackets not matching? In one picture, the bracket's lip faces the front while the other shows the lip facing the rear.
Is it just me or are your rear brackets not matching? In one picture, the bracket's lip faces the front while the other shows the lip facing the rear.
I think thats right, thats the way everything lined up correctly ???
been on a long time now trouble free, (except hitting the exhuast)
I cut a 1.63 last time out, so I'm not complaining

#12
07-31-2004 | 02:36 PM

Senior Member
Joined: Jul 2004
Posts: 463
Likes: 0
From: Midwest
Rob,
The direction the lip faces shouldn't matter as long as the bars lined up correctly at the same angles.
How are your bars hitting the exhaust? You only have 2 inch shackles and a stock catback correct? You shouldn't have this problem unless you are going over huge bumps at a decent speed...
The direction the lip faces shouldn't matter as long as the bars lined up correctly at the same angles.
How are your bars hitting the exhaust? You only have 2 inch shackles and a stock catback correct? You shouldn't have this problem unless you are going over huge bumps at a decent speed...
#13
07-31-2004 | 04:31 PM
Senior Member
Joined: Mar 2002
Posts: 11,153
Likes: 0
From: Selden NY
I still have the factory exhuast, the Stock Tips get in the way,
may have complained about it.
This was taken the day of the install

Before no time, it ripped the rubber out, and rubbed a nice chunk
right out of the Bar itself

Finally I figured out all I had to do was cut the clamp holders off
with a Dremel, and swing the clamps almost 180 degrees,

(Ya I know my tips are shot, but I've sinced sanded them down and now they're galvanized looking but at least clean)
It still hits sometimes, but Sal helped me gain a little clearance and actually just this afternoon I bend the upper bracket even a little more pulling the tips up a bit more and I should be ok now.
may have complained about it.
This was taken the day of the install
Before no time, it ripped the rubber out, and rubbed a nice chunk
right out of the Bar itself
Finally I figured out all I had to do was cut the clamp holders off
with a Dremel, and swing the clamps almost 180 degrees,
(Ya I know my tips are shot, but I've sinced sanded them down and now they're galvanized looking but at least clean)
It still hits sometimes, but Sal helped me gain a little clearance and actually just this afternoon I bend the upper bracket even a little more pulling the tips up a bit more and I should be ok now.