

Removed bed and changed fuel pumps...pics inside.
#1
 04-17-2006 | 10:17 PM

Thread Starter
|
Senior Member
Joined: Aug 2001
Posts: 3,519
Likes: 0
From: Greater Boston
Removed bed and changed fuel pumps...pics inside.
Ok, I asked for assistance on removing the bed because I planned on cleaning up the frame and changing my fuel pumps. A couple guys asked if I'd post pics. Here's a little play by play and a half *** how to. I'll let some of you who have never done it in on some secrets I learned the hard way.

First, you have to remove the tail lights. To do this, you open the bed, and there are 2 bolts on the inside that hold them in. Disconnect the plugs from the lights and removed the lights. Undo the wiring harness clips and fish the harness down the holes they come up through.

Next, take out the plate lights and undo the clips. Fish the harness out of the bumper and drop it down.

Here is the key right here. Undo the 4 nuts and take the bumper right off. When I first attempted to lift the bed from underneath, I was having a bitch of a time. I then decided to use straps and lift it from above, still had trouble and realized it was the bumper. I was a little worried about taking it off because I didnt' want it all misalligned but it was easy as pie. The bed kept catching on the bumper so as I raised it, it kept pushing frontward and hitting the cab which was bad.
Next post........
First, you have to remove the tail lights. To do this, you open the bed, and there are 2 bolts on the inside that hold them in. Disconnect the plugs from the lights and removed the lights. Undo the wiring harness clips and fish the harness down the holes they come up through.
Next, take out the plate lights and undo the clips. Fish the harness out of the bumper and drop it down.
Here is the key right here. Undo the 4 nuts and take the bumper right off. When I first attempted to lift the bed from underneath, I was having a bitch of a time. I then decided to use straps and lift it from above, still had trouble and realized it was the bumper. I was a little worried about taking it off because I didnt' want it all misalligned but it was easy as pie. The bed kept catching on the bumper so as I raised it, it kept pushing frontward and hitting the cab which was bad.
Next post........
Last edited by tallimeca; 04-17-2006 at 10:25 PM.
#2
04-17-2006 | 10:30 PM
Thread Starter
|
Senior Member
Joined: Aug 2001
Posts: 3,519
Likes: 0
From: Greater Boston
next
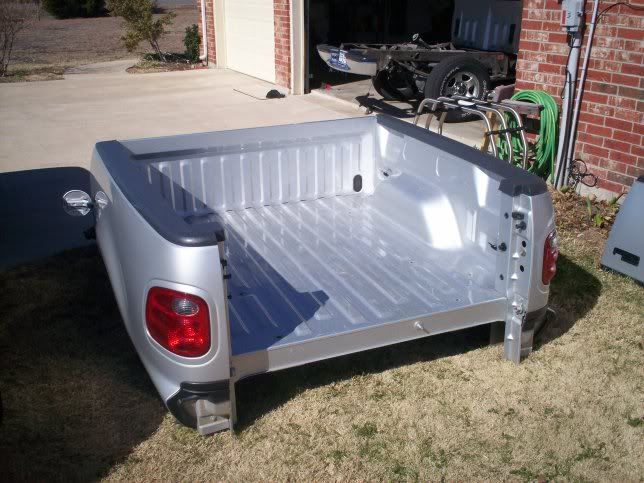
Here is a picture after the bed is removed, but there is a worm gear clamp that goes around the filler tube that attatches to a small flat tab underneath them bed, you have to undo this. Naturally, you want to remove the three screws that hold the filler tube to the body where you open the gas door.
Next, I pulled the carpet out of the bed to locat the bolts. I used a T50 socket with an impact driver. After soaking the bolts down for about 15 minutes, they came right out no problem. I will caution you, someone mentioned that they are a T52, which Me, nor none of the mechanics that work for me had, and no store around had. The 50 was a bit sloppy but there was no room to slip with the impact driver.
This is what we use in the shop. I never thought there was anything better then aerokroil, but this stuff is really great.
Next....
#3
04-17-2006 | 10:44 PM
Thread Starter
|
Senior Member
Joined: Aug 2001
Posts: 3,519
Likes: 0
From: Greater Boston
Next
ok, there is where I ran into a snag and had a little learning curve. I tried to lift the bed with the arms underneath. Turned out, my problem was the bumper. I already had it rigged to come off by lifting it with straps so that's the way I went. I will say that if you are just doing pumps, it's not necessary to actually lift the bed up off the truck. You can just slide it back and have plenty of room, but where I was looking at the frame to clean up, I did it the way I did. All said and done, with some of these tips, I'd say you can have the bed off in just shy of an hour. Mind you, I did this by myself so a spare set of hands would make things alot easier.

Here is what you are looking at removing. You need 5/16 or 8mm socket to undo the tank bolts. Undo the 2 fuel lines and the 1 wiring harness. Pull the assembly off and up through the tank.
This part is self explanitory. Undo the screw that holds the pumps in. Disconnect the lines and harnesses. Install your new pumps, lines, and clamps. The reason I did this was because I wanted to inspect the clamps because of the news of the lines blowing off. I figured if I was gonna do it, might as well upgrade. Guess what. The line that goes from the y fitting up to the tank output was loose. I could spin it right around and if i attempted to , I could have pulled it right off. I used the walbro pumps with a stanless y fitting and worm gear clamps. Here's the assembly ready to go back in.

Now I ran the tank just about out of gas before I did this. I then used my Slurpee machine (awsome tool to have) and sucked the rest of the fuel out of the tank. It wasn't as bad as I would have though but there was a decent amout of water.

Next....
Here is what you are looking at removing. You need 5/16 or 8mm socket to undo the tank bolts. Undo the 2 fuel lines and the 1 wiring harness. Pull the assembly off and up through the tank.
This part is self explanitory. Undo the screw that holds the pumps in. Disconnect the lines and harnesses. Install your new pumps, lines, and clamps. The reason I did this was because I wanted to inspect the clamps because of the news of the lines blowing off. I figured if I was gonna do it, might as well upgrade. Guess what. The line that goes from the y fitting up to the tank output was loose. I could spin it right around and if i attempted to , I could have pulled it right off. I used the walbro pumps with a stanless y fitting and worm gear clamps. Here's the assembly ready to go back in.
Now I ran the tank just about out of gas before I did this. I then used my Slurpee machine (awsome tool to have) and sucked the rest of the fuel out of the tank. It wasn't as bad as I would have though but there was a decent amout of water.
Next....
#4
04-17-2006 | 10:51 PM
Thread Starter
|
Senior Member
Joined: Aug 2001
Posts: 3,519
Likes: 0
From: Greater Boston
and........
I then painted the axle, some of the suspension, and my traction bars. Nothing fancy, just some rustoleum to clean it up a bit.

All in all, I would say to pull the bed, change pumps, and reinstall the bed...3 hours is a safe bet, although it could be done quicker with help. The job didn't come without consequence. When putting the bed back on, I backed the truck under the bed. The bed must have sagged a bit on the passenger side and the tire caught the corner of the ground affect. My stupidity, I should have checked and if i had an extra pair of eyes, probably wouldn't have happened. Those ground affect are pretty damn flexible I'll tell you. You should have seen what it looked like when it happend, i lifted the bed and it popped right back in shape, aside for the tear, but that's a minor repair.

All in all, I would say to pull the bed, change pumps, and reinstall the bed...3 hours is a safe bet, although it could be done quicker with help. The job didn't come without consequence. When putting the bed back on, I backed the truck under the bed. The bed must have sagged a bit on the passenger side and the tire caught the corner of the ground affect. My stupidity, I should have checked and if i had an extra pair of eyes, probably wouldn't have happened. Those ground affect are pretty damn flexible I'll tell you. You should have seen what it looked like when it happend, i lifted the bed and it popped right back in shape, aside for the tear, but that's a minor repair.
#5
04-17-2006 | 10:58 PM
Thread Starter
|
Senior Member
Joined: Aug 2001
Posts: 3,519
Likes: 0
From: Greater Boston
other pics
Here are some pics of my other toy. 10 second 91 Hatch.

Here's the interior. It's non street, strictly race so the interior is gutted.

408w with Victor JR heads and intake. Hooker long tubes. MSD Ignition. We just added a NitrousWorks system over the winter to play around with. Dynamic C4 tranny. We tubed out the back and changed some of the frame and suspension to squeeze 28's under there. We run it on street night so it's on E/T streets and actually has mufflers.

Here's the interior. It's non street, strictly race so the interior is gutted.
408w with Victor JR heads and intake. Hooker long tubes. MSD Ignition. We just added a NitrousWorks system over the winter to play around with. Dynamic C4 tranny. We tubed out the back and changed some of the frame and suspension to squeeze 28's under there. We run it on street night so it's on E/T streets and actually has mufflers.


#7
04-17-2006 | 11:04 PM

Senior Member
Joined: Aug 2001
Posts: 1,987
Likes: 0
From: MA
Trending Topics


#10
04-18-2006 | 12:33 AM
Global Moderator &
Senior Member
Senior Member
Joined: Aug 2005
Posts: 21,312
Likes: 136
From: DFW
there is actually a major disconnect in the main wireing hareness that is just behind the bumper, about straight even with the left frame rail. If you disconnect there, that is all you have to disconnect, and then you slip the license plate lights out of their holders. Much faster and easier IMHO then pulling the tail lights etc.
And it only took two of us two pull the bed, no lifts or anything. And like i said in the other thread, i wish i protected against scratching the bed

but oh well
-Patrick
And it only took two of us two pull the bed, no lifts or anything. And like i said in the other thread, i wish i protected against scratching the bed
but oh well
-Patrick
#11
04-18-2006 | 08:30 AM

Senior Member
Joined: Sep 2003
Posts: 192
Likes: 0
From: Central Florida
Originally Posted by Patman03SprCrw
And it only took two of us two pull the bed, no lifts or anything. And like i said in the other thread, i wish i protected against scratching the bed
-Patrick
-Patrick
Thanks,
David
#12
04-18-2006 | 09:42 AM
Thread Starter
|
Senior Member
Joined: Aug 2001
Posts: 3,519
Likes: 0
From: Greater Boston
harness
there is actually a major disconnect in the main wireing hareness that is just behind the bumper, about straight even with the left frame rail.
Anyhow, it would be easier but it's less than 5 minutes to pull the lights. Plus you get to clean out all the crap that builds up in there.
#13
04-18-2006 | 12:18 PM
Global Moderator &
Senior Member
Senior Member
Joined: Aug 2005
Posts: 21,312
Likes: 136
From: DFW
yea there are two disconnects there in that area, i believe the larger one is the one your looking for, if i remember correctly the trailer harness is like right on the bumper, and the other one is maybe a foot infront of the bumper. And mine was on the outside of the frame rail, so the spare shouldnt be obstructing your veiw.
I do have the shortest 5.5 foot bed, but i wouldnt think it to be just amazingly lighter then the flareside bed. I believe the flare side bed utilizes fiberglass out walls like mine has, which really reduces the weight. And with the tailgate/bedextender gone its pretty light for as big as it is.
I was funny tho it seemed alot lighter coming off then it did when we put it back on, that is after grinding off the hanger bolts, swapping hangers, shocks, bumpstops, and retorqueing all the bolts. even with air tools i was exausted. We actually needed a third person when we put it back on, to make sure the gas filler neck lined up and wasnt getting bent as we relowered the bed.
-Patrick
#14
04-19-2006 | 08:14 AM

Senior Member
Joined: Sep 2003
Posts: 2,454
Likes: 0
From: NY
I was funny tho it seemed alot lighter coming off then it did when we put it back on, that is after grinding off the hanger bolts, swapping hangers, shocks, bumpstops, and retorqueing all the bolts. even with air tools i was exausted. We actually needed a third person when we put it back on, to make sure the gas filler neck lined up and wasnt getting bent as we relowered the bed.
-Patrick[/QUOTE]
how did the hangers work out for you. i have them and going to be installing them soon(been saying that for 6+months now )
)
-Patrick[/QUOTE]
how did the hangers work out for you. i have them and going to be installing them soon(been saying that for 6+months now
)
#15
04-19-2006 | 06:48 PM

Senior Member
Joined: Jul 2001
Posts: 4,121
Likes: 0
From: Hammer Lane
My pumps were changed this weekend as well. The tank was dropped with the truck on stands. Pumps installed. The tank was jacked back into place and re-attached. It took a little over an hour; and, no damage was done to the vehicle. The tank was half full, too. This way is much easier and quicker than removing the bed. No need for that... Unless you're going to clean the frame, I guess.